As educators, we know that a single moment of positive reinforcement can change the entire trajectory of a student’s week. But let’s be honest: between grading, lesson planning, and navigating the daily data deluge, finding the time to manually draft and send individual “Kudos” emails to parents or students often feels impossible.
We want to celebrate those quick wins, but administrative friction gets in the way.
What if you could automate that workflow entirely from a Google Sheet, reclaiming hours of your time while still delivering deeply personalized, meaningful feedback?
Today, we are going to build the Automated Celebration Engine. Not only will this tool streamline your communication, but you will also learn the fundamentals of Google Apps Script in the process. We will break down the code step-by-step so you know exactly how it works, explore how to customize your messaging, add a real-time tracking timestamp, and package it into a custom menu right inside your spreadsheet.
Setting Up Your Spreadsheet
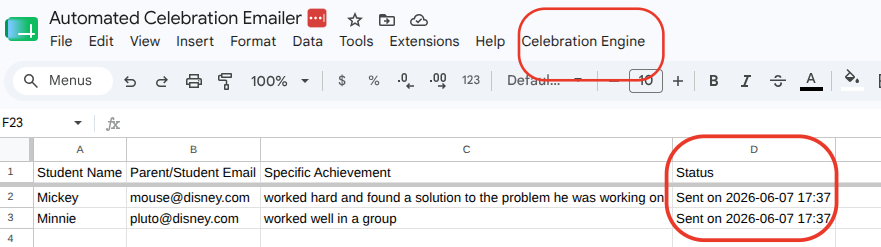
Before writing any code, we need a clean, structured place for our data to live. Open a new Google Sheet and set up your columns exactly like this:
- Column A: Student Name
- Column B: Parent/Student Email
- Column C: Specific Achievement (e.g., persevered through a tough math problem today)
- Column D: Status (Leave this blank! Our script will use this column to track when an email is sent so we don’t send duplicates.)

With your sheet prepped, go to the top menu, click on Extensions, and select Apps Script. Delete any default code in the editor, and let’s get building.
Step-by-Step Code Breakdown
Instead of dropping a massive block of code on your screen, we are going to look at this engine piece by piece.
1. Creating the Custom Menu (onOpen)
To make this tool accessible to any teacher using your sheet, we don’t want to force them to open the Apps Script editor every time. Instead, we can build a custom menu button that appears right alongside “File” and “Edit”.
Paste this initial function into your editor:
function onOpen() {
  var ui = SpreadsheetApp.getUi();
  ui.createMenu('Celebration Engine')
    .addItem('Send Celebration Emails', 'sendCelebrationEmails')
    .addToUi();
}
What is happening here?
function onOpen(): This is a built-in “trigger” in Google Apps Script. It tells Google to run this exact code automatically every single time the spreadsheet is opened.SpreadsheetApp.getUi(): This fetches the User Interface environment of your active spreadsheet, allowing us to make visual changes to the top menu bar..createMenu('Celebration Engine'): This creates a brand-new main menu option labeled “Celebration Engine”..addItem(...): This adds a clickable option inside that menu. The first part ('Send Celebration Emails') is the text the user sees; the second part ('sendCelebrationEmails') is the exact name of the core function we are about to write below.
2. Initializing the Core Function and Targeting Data
Now, let’s start building the main engine. We need to tell our script exactly where to look for student information.
function sendCelebrationEmails() {
  var sheet = SpreadsheetApp.getActiveSpreadsheet().getActiveSheet();
  var startRow = 2; // First row of data (under headers)
  var numRows = sheet.getLastRow() - 1; // Number of rows to process

  // Get the data range and values
  var dataRange = sheet.getRange(startRow, 1, numRows, 4);
  var data = dataRange.getValues();
What is happening here?
SpreadsheetApp.getActiveSpreadsheet().getActiveSheet(): This finds the spreadsheet you are currently looking at and targets the active sheet tab.sheet.getLastRow() - 1: This dynamically calculates how many rows of student data you have. If you have 10 rows total, the last row is 10. We subtract 1 because our top row consists of headers, meaning we have 9 rows of student data to process.sheet.getRange(startRow, 1, numRows, 4): This defines the exact boundary box of our data. We start at row 2, column 1 (Column A), read down for our total number of data rows, and look across 4 columns total (Columns A through D)..getValues(): This pulls the raw information out of those cells and stores it into a neat programming array calleddata.
3. Looping Through Your Students
With our data safely stored, we need to look at each student’s row one by one. We use a standard programming loop to achieve this.
  for (var i = 0; i < data.length; ++i) {
    var row = data[i];
    var studentName = row[0];
    var emailAddress = row[1];
    var achievement = row[2];
    var status = row[3];
What is happening here?
for (var i = 0; i < data.length; ++i): This is aforloop. It tells the script to start at index0(which is row 2 of our sheet) and repeat the code inside the brackets for every single row stored in our dataset.var row = data[i]: This isolates the specific row we are currently evaluating.row[0],row[1],row[2],row[3]: In programming, counting always starts at zero.row[0]grabs the item in our first column (Student Name),row[1]grabs the second column (Email Address), and so on.
4. Setting Conditions and Formatting Your Message
We don’t want to accidentally email the same family twice, nor do we want the script to break if a row is missing an email address. We need to set a rule to filter those rows out, and then construct our message template.
    // Only send if the email hasn't been sent yet and email address is valid
    if (!status.toString().match(/^Sent/) && emailAddress !== "") {
      var subject = "A Quick Win to Celebrate: " + studentName + "!";

      var emailBody = "Hi there,\n\n" +
                      "I wanted to share a quick, positive moment from the classroom today.\n\n" +
                      studentName + " " + achievement + ". It was a fantastic demonstration of " +
                      "perseverance, and I wanted to make sure they got credit for navigating " +
                      "challenges with a growth mindset!\n\n" +
                      "We all encounter roadblocks, but today, " + studentName + " showed exactly " +
                      "how to climb over them.\n\n" +
                      "Best regards,\n" +
                      "[Your Name/Title]";
What is happening here?
if (!status.toString().match(/^Sent/) && emailAddress !== ""): This checks two things before doing anything else. First, it verifies that our status column doesn’t start with the word “Sent”. Second, it checks to ensure the email field isn’t empty (!== ""). If both conditions are met, the script proceeds.\n\n: This represents a line break (hitting the ‘Enter’ key) inside a plain text email block so your paragraphs don’t run together.+ studentName +: By wrapping variables in plus signs, we can inject our dynamic data right into the text, blending static sentences with student-specific names and achievements.
5. Delivering the Email and Stamping the Tracking Details
Finally, we send the email out to the world and leave a visual trail in our spreadsheet so we know the task is completed.
      MailApp.sendEmail(emailAddress, subject, emailBody);

      // Combine "Sent" with a human-readable live timestamp
      var timestamp = "Sent on " + Utilities.formatDate(new Date(), "EST", "yyyy-MM-dd HH:mm");
      sheet.getRange(startRow + i, 4).setValue(timestamp);

      // Ensure the sheet updates in real-time
      SpreadsheetApp.flush();
    }
  }
}
What is happening here?
MailApp.sendEmail(...): This is Google’s native delivery tool. It takes the email address, subject line, and body template we generated and shoots it off instantly through your connected Google Workspace account.new Date(): This pulls the exact day and time the script is running.Utilities.formatDate(...): This formats that raw system date into a readable string (like2026-06-07 12:09). Note: Feel free to swap out “EST” for your local timezone code.sheet.getRange(startRow + i, 4).setValue(timestamp): This goes back to our spreadsheet, targets Column 4 (Column D) for the specific row we are working on, and writes out our brand new time-stamped status message.SpreadsheetApp.flush(): This tells Google Sheets to update the display right now, allowing you to watch the statuses change in real-time on your screen as the script loops through your rows.
Tailoring Your Messages (The Future of CSS and HTML)
Right now, our script constructs a standard plain-text email using \n\n for spacing. It gets the job done quickly and clearly!
However, if you want your messages to look completely professional, you can actually design emails using HTML and basic CSS styling. This allows you to add bold text, colored headers, custom fonts, and styled buttons. To utilize HTML, we would replace our basic messaging logic with a structural property called htmlBody. We will dive deeply into exactly how to construct and code gorgeous HTML email templates in an upcoming post—so keep an eye out!
The Complete “Automated Celebration Engine” Script
Here is the entire code block combined. Copy everything below, paste it into your Google Apps Script editor, click the Save icon, and then refresh your Google Sheet to see your custom menu come to life!
/**
 * Automatically adds a custom menu when the Google Sheet opens.
 */
function onOpen() {
  var ui = SpreadsheetApp.getUi();
  ui.createMenu('Celebration Engine')
    .addItem('Send Celebration Emails', 'sendCelebrationEmails')
    .addToUi();
}

/**
 * Iterates through rows, constructs custom positive feedback templates,
 * delivers emails via MailApp, and stamps tracking dates in the status column.
 */
function sendCelebrationEmails() {
  var sheet = SpreadsheetApp.getActiveSpreadsheet().getActiveSheet();
  var startRow = 2; // First row of data (under headers)
  var numRows = sheet.getLastRow() - 1; // Number of rows to process

  // Get the data range and structural values
  var dataRange = sheet.getRange(startRow, 1, numRows, 4);
  var data = dataRange.getValues();

  for (var i = 0; i < data.length; ++i) {
    var row = data[i];
    var studentName = row[0];
    var emailAddress = row[1];
    var achievement = row[2];
    var status = row[3];

    // Only send if the email hasn't been sent yet and email address is valid
    if (!status.toString().match(/^Sent/) && emailAddress !== "") {
      var subject = "A Quick Win to Celebrate: " + studentName + "!";

      var emailBody = "Hi there,\n\n" +
                      "I wanted to share a quick, positive moment from the classroom today.\n\n" +
                      studentName + " " + achievement + ". It was a fantastic demonstration of " +
                      "perseverance, and I wanted to make sure they got credit for navigating " +
                      "challenges with a growth mindset!\n\n" +
                      "We all encounter roadblocks, but today, " + studentName + " showed exactly " +
                      "how to climb over them.\n\n" +
                      "Best regards,\n" +
                      "[Your Name/Title]";

      // Deliver the formatted message
      MailApp.sendEmail(emailAddress, subject, emailBody);

      // Combine "Sent" text with a live, readable timestamp tracking string
      var timestamp = "Sent on " + Utilities.formatDate(new Date(), "EST", "yyyy-MM-dd HH:mm");
      sheet.getRange(startRow + i, 4).setValue(timestamp);

      // Ensure the sheet visual display updates in real-time
      SpreadsheetApp.flush();
    }
  }
}
Authorization: A Quick Note For First-Time Users
When you click your brand-new “Send Celebration Emails” menu option for the very first time, Google will throw up an “Authorization Required” popup window. Do not panic!
Because you are running custom code that sends emails on your behalf, Google security simply requires you to explicitly grant your script permission to run. Click through Continue, select your Google account, click on Advanced at the bottom of the prompt, and select Go to Untitled project (unsafe) (or whatever name you gave your script file). Click Allow, and your engine is authorized to run forever.
With this setup, you can focus on noticing those magical classroom wins without worrying about finding the administrative time to type out every single email. You’ve built an engine to take care of that for you!
How are you planning on customizing your classroom celebration message? Let’s discuss it in the comments below!